How to Tie Fishing Knots: 10 Easy Knots to Get You Started

Fishing knots are created and used everyday by many anglers worldwide. There is a variety of fishing knots, each has a different role, from attaching a line to a hook or swivel, attaching a line to a lure, to connecting and joining lines.
If you have the right fishing knots, you have a powerful weapon for your fishing trip. For new aspiring anglers, some simple knowledge about tying fishing knots could be a great start. However, you can get lost because the Internet offers plenty of fishing knot combinations. Don’t freak out, you don’t need to learn all types of fishing knots, at least not right away. To help you be prepared, listed below are 10 easy knots to get you started before you venture into any fishing activity.
Thanks to John Morris for the 10 Easy Knots to improve your fishing near Bishop, CA
Tips Before Starting
- You should choose the right fishing knot and tie it properly.
- You should lubricate or add moisture to the knots with either water or saliva before tightening it down.
- Make sure to your knots are perfectly tighten.
- You should trim or cut tag ends of your knot.
- Practice, practice, practice!
Click on the toggles below for details about each knot
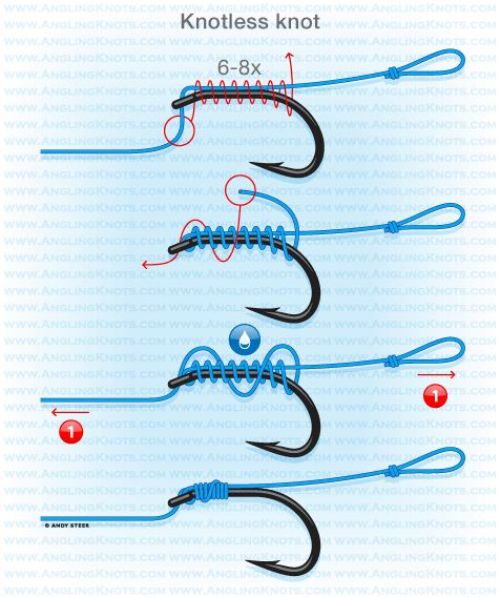
The first knot we will be featuring is the Knotless Knot. This knot can be regarded as one of the quickest and easiest way to snell a hook. The primary use of this knot is for attaching a fishing line to the hook.

Via Pinterest.com
1. First you must cut your leader line to the desired length and tie a loop at the end portion to hold the bait.
Slowly insert the other end of line through the eye from the front to the back of the hook, following through the shank. Estimate the length of the leader line in the hook’s shank.
2. Next, hold the shank of the hook with the tag end of your leader line firmly. Then begin wrapping 7 – 8 times, starting from the shank working its way towards the near end of the leader line.
Make sure the lines don’t overlap each other as you wrap. Allow them to be properly aligned side by side.
3. After wrapping the hook of the shank, grab the other end of your leader line and insert it slowly from the back to the front of the hook’s eye.
4. Finally, add moisture to your knot and pull the other end of your leader line while holding the hook and the line with a loop to help tighten and give you a firm grip, letting you set the snell knot.
The second knot in our list is the Improved Clinch Knot. Regarded as one of the important knots to know, it is primarily used by anglers in securing lures, hooks, and swivels to their fishing line.
This particular knot is strong, firm and reliable for every fishermen for it can withstand a battle with big fishes.

Via fishing.boyslife.org
1. Slowly pass the tag end of through the hook’s eye, then wrap 5 – 7 times on the body of the line
2. Insert the tag end through the small loop nearest to the hook’s eye, then bring it back in the loose part of the line.
3. Add moisture to the knot and pull the two ends until tighten.
4. If needed, trim the excess tag end.
The third knot in our list is the Palomar Knot. This knot is known to anglers as one of the strongest knot, where its primary function is to attach the line to the hook.
This knot have similar functions to the knotless knot and the improved clinch knot, which is to secure hooks or swivels to one end the fishing line.

Via fishing.boyslife.org
1. Create a loop by doubling your line, then slowly insert the loop into your hook’s eye.
2. Make an overhand knot that is loose.
3. Carefully move the loop through your hook’s end.
4. Gently pull the line while holding your hook.
5. Trim any excess tag end if needed.
The fourth knot in our list is the Blood Knot. Unlike the previous mentioned knots, the blood knot is not used to fasten or secure a fishing line to lures or hooks.
It is instead used for tying or joining together two parts of fishing line with approximately the same thickness.
According to the International Game Fish Association this knot is considered to be one of the top grade knots when joining one line to another, the other one is the Hangman’s Knot – also called the Uni Knot.
1. Line several inches of two ends of two line against each other, then start wrapping one line on the other five times at least.
2. Repeat by wrapping the other line on the first one another five times, then bring back two loose ends to the hole in the middle.
3. Work the knot out carefully by making sure that the ends of the lines will not be out of position. Pull on each of the line so your knot is perfectly snug.
The fifth knot in our list is the Surgeon’s Knot. This particular knot is as handy as the blood knot when you’re trying to join or connect two pieces of fishing line.
But when you are trying to tie two lines with varying thickness or diameter, the surgeons knot is the ideal choice instead of the blood knot.
1. Lay the lines on top of one another overlapping each other by about several inches.
2. Tie an overhand knot to create a simple loop for the lines to work as one.
3. Carefully pass both the tag end and the entire leader through the created loop about 2 times.
(Optional) You can pass both tag end and leader through the created loop again, making it 3 times, to tie the ‘Triple Surgeon’s Knot’.
4. Add moisture to the knot and slowly pull all 4 ends tight.
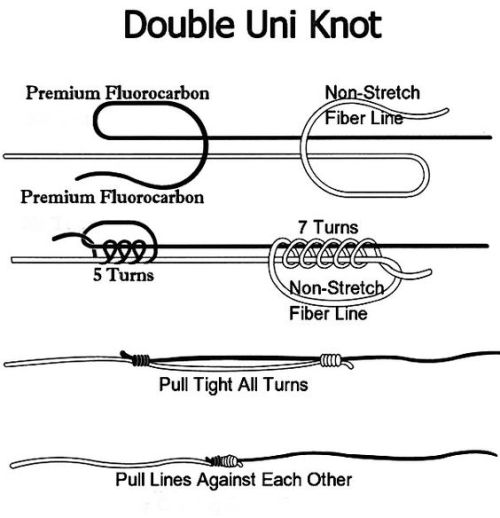
This kind of knot is simply a manipulation of the hangman’s knot or the uni knot, in which it is used in joining two lines.

Via pinterest.com
1. Overlap the tag ends of the lines to be joined. Using one end of the line from either left or right, create a loop over the doubled line by laying the tag end and start wrapping 3-4 times around both lines passing through the loop.
Slowly pull the tag end until tighten.
- For mono to mono make 3-4 wraps
- For mono to braided, take 4-5 wraps for mono and 7-8 wraps for the braid
2. Repeat the process with the other tag end of the line.
3. Now that you have tied two uni knots, carefully pull the standing lines from the direction to help slide and join the two knots together.
4. Trim tag ends close to the knot if necessary.
The seventh knot in our list is the Double Surgeon’s Loop also known as the Surgeons End Loop. It is a quick and easy way for you to tie a loop in the end of your leader.
Anglers often use this knot as part of their leader system because it is undoubtedly strong.

Via fishing.boyslife.org
1. Take the tag end of the line, fold it over or double it to make a loop of the required size.
2. Tie a single overhand knot at the desired point and leaving it open.
3. Slowly pass the loop one more time through the overhand knot.
4. Moisten the knot, hold both the line and the end part together then pull the loop until tighten to form the knot. Trim tag end if necessary.
The eighth knot in our list is the Stopper Knot. This kind of knot is quite popular with anglers who fishes with slip floats or slip bobbers. It is tied on the main line above the sliding slip bobber. The stopper knot grips the line to where it is located.
You will be able to adjust the sliding bobber to achieve the desired depth during fishing. It is quite handy during casting for it can be reeled in past the eyes of your fishing rod.
As your bait settles down to the desired depth, the slip bobber will slides up the main line and stops when it hits the stopper knot.
1. This knot is similar to the uni knot. First you must estimate at least 6 inches of fishing line. Tie the stopper parallel to the fishing line in the desired location and double back to create a loop.
2. Start wrapping by making 3 – 4 turns around both lines passing each time through the open loop.
3. Slowly pull the two tag ends of the stopper in opposite directions until tighten down to form the knot.
4. Trim excess tag ends if necessary.
The last but definitely not the least in our list is the Dropper loop. It is another popular fishing knot used by anglers who attaches additional baits or jigs and flies to their fishing line.
Just a quick tip, avoid making too many loops as it increases the chance of twisting and fouling
1. First you must form a loop in your fishing line.
2. Grab one side of the loop and start wrapping 6 or more turns around the line itself.
Note: You must keep the point open where the twists or turns are being made. You can use your finger and put it inside the center opening so that it would not be lost.
3. Grab the original loops and pull it through the middle opening.
4. Hold the original loop with your teeth. Wet the knot with saliva and gently pull on both ends of the line in opposite directions.
5. Pull the lines as tightly as possible until coils tighten. The turns will then make the loop stand at the right angles to the line.
Czech Nymphing, the most essential dropper for your ladder leader rigs is to attach a fly to a section of tippet and then tie a figure of eight loop the opposite end.
Recommended is 4” (10-cm) droppers which combines good take detection with adequate separation from the main stem.
More Knots from Catfish and Carp
This video includes some of those listed above plus a few more.
Conclusion
That’s all folks! By learning these 10 easy fishing knots, you’ll probably be more flexible, much more prepared and ready for your next fishing trip. Some practice and you will become a pro in no time!
Check out these related fishing blogs
Request a FREE Bishop Information Guide
Look!!! Let’s plan a Death Valley Trip. Ask about including a visit from Bishop.
And don’t forget to check out all our great lodging options.
Read and study these pages, download the brochures and maps, and plan a trip to Bishop and the Eastern Sierra. Call us: (760) 873-8405, or email us: info@bishopvisitor.com and let us help you choose your future adventure. We look forward to meeting you then!
Please follow us on social media:
Facebook | TikTok| YouTube | Instagram
Check out the latest blog posts on BishopVisitor.com!
Written by:
Bishop Host
Bishop Visitor Center hosts are here to enhance your experience traveling through this small town with a big backyard. We welcome you to stop by, email or call to chat with the friendly, knowledgeable staff.


